Tag Archives: Kelly skirt

Finished: Another Kelly skirt for Kelly

30 Dec

Wow, it seems that I dropped off the radar a bit recently, I do apologise! I have a few finished makes to show you all, and a few other posts lined up as well, but I just haven’t found the time to sit down and get them written. I’m still a bit preoccupied by the whole house buying thing (we exchanged on the 13th December, complete on 17th Jan and move in 1st Feb and I CAN’T WAIT!!), as well as trying to buy a new car before mine completely gives up on me, and I find it a little tricky to focus on more than one project at once.

megan-nielson-denim-kelly-skirt-14

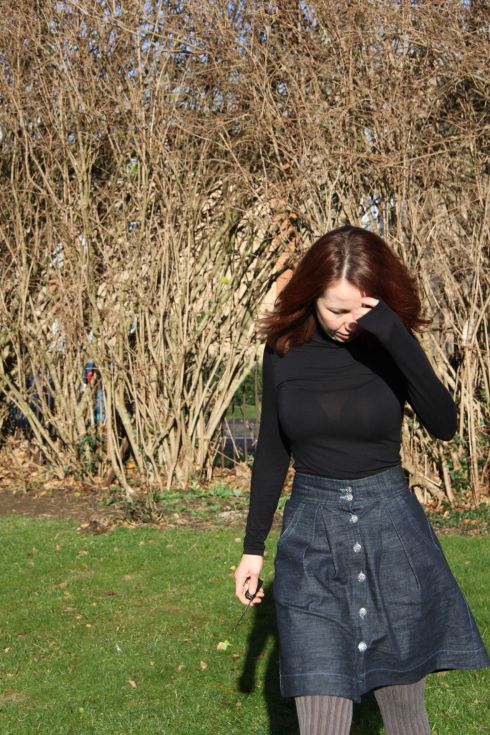
I swear this top is not see through in real life either! Seriously, what is going on?!

The weather and just general winter-ness doesn’t help, as it leaves limited opportunities for photo taking! I had a week off work the week before Christmas, and jumped on the first sunny day to get outside and photograph 4 of my recent makes (watched closely from the balcony by our neighbour’s 3 year old! Man I am going to miss that kid when we move!)

megan-nielson-denim-kelly-skirt-13

I hope you all had good Christmases, with many lovely sewing-related packages under the tree. I was down at my parents’ for a few days just seeing my family, and also taking the time to box up all my possessions that are still there! It was quite a low key Christmas this year, but it was lovely to see them all, and also spend some time with our dog, who hasn’t been well recently, and had to have surgery just before Christmas to tie back his vocal chords as they were blocking his airways, and he gave us a couple of little scares over the holidays.

1522299_10100691811386599_58154723_n

So, onto the good stuff! I loved my first Kelly skirt so much that the next thing I made was another one! This was the only thing I made in my sewing week that wasn’t, and I got it all finished in an afternoon, except for the buttons and buttonholes, which took me another couple of weeks to get round to doing – I was dreading them after the nightmare I had with the buttonholes on my first one!

megan-nielson-denim-kelly-skirt-3

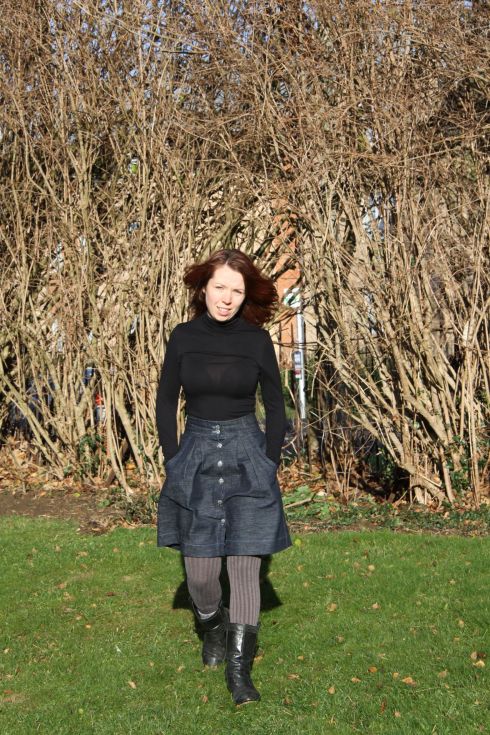
Still love having pockets!

This skirt was just as easy as the first one, slightly moreso in fact, as I didn’t have to piece the pattern pieces together from limited fabric! This version is a denim one, made from some stretch denim I got for £4/m on Goldhawk Road. The denim was lovely to work with, the only problem I ran into was that, after I’d basted the pleats into the skirt, and went to sew it to the waistband, the skirt section was about 5cm longer than the waistband. I think it must have stretched with ironing when I was doing the pleats. I remedied this by making each of the pleats slightly bigger, to take in the excess.

megan-nielson-denim-kelly-skirt-1

megan-nielson-denim-kelly-skirt-22

I had the same problems with the buttonholes as I did on my corduroy one – in particular the top one on the button placket and the two on the waistband. I moved the top button placket one up on this version, to try and avoid the gaping that I had at the top of the first version. Despite putting the buttonhole in as high up as I could, there is still a little bit of gaping. On the next version (yes there will be another one!), I think I will try putting the buttonholes on the placket in before I attach the skirt to the waistband, as that should allow me to get it higher up. I eventually got the buttonholes in, but they are by no means perfect – the ones on the waistband don’t quite line up with the ones on the placket, which are a bit far over to the edge, and the spacing isn’t quite even but do you know what, it really doesn’t matter!

megan-nielson-denim-kelly-skirt-6

megan-nielson-denim-kelly-skirt-25

I am much happier showing off the innards of this skirt – I overlocked all the edges, and remembered to do it before I did the hem and waistband, which means all the ends are nicely tucked away, and it looks really neat and professional. I also love the fabric I used for the pocket lining (some of my freecycle stash), and the metal button as well.

megan-nielson-denim-kelly-skirt-27

megan-nielson-denim-kelly-skirt-21

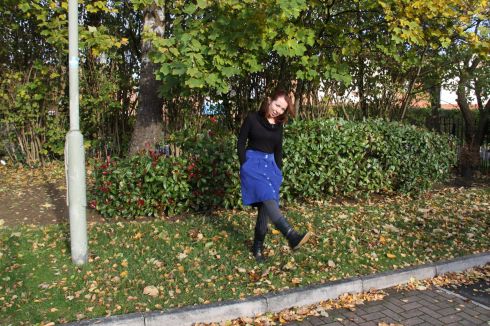
If I loved my first Kelly skirt, then I am absolutely head over heels for this one – I have worn it SO many times since I have made it. The denim has much more structure than the corduroy, which shows off the pleats beautifully. I could happily live in this skirt, it’s perfect for winter with some thick tights and a cosy jumper, but should work equally well in sumer.

megan-nielson-denim-kelly-skirt-12

The only thing I’d change on this one would be to make the waistband a bit smaller – it’s a teensy bit big as it is, which means that it doesn’t quite sit on my natural waist, and so the waistband doesn’t sit entirely flat. Pinching out an inch at the back makes it sit much more where it should. I also can’t remember if I remembered to interface the waistband or not – I might have, but then again I might not have! Who knows! That slight waistband issue doesn’t detract at all from how much I love this skirt. It’s such a quick and easy make, looks equally good with a top tucked in, or with a jumper over the top and is such a great wardrobe staple.

megan-nielson-denim-kelly-skirt-19

megan-nielson-denim-kelly-skirt-17

Finished: My namesake skirt

23 Nov

It had to be done really didn’t it? At some point I was going to have to make a Kelly skirt. I held off for quite a while, I wasn’t entirely sure about it, and all of the Megan Nielson patterns also seemed to be in short supply. But then she released some of her patterns at PDFs, and they worked out at about £7 each – half the price of the printed patterns. That made it a no brainer really – I bought both the Kelly skirt and Tania culottes pattern the day the PDFs were released.

megan-nielson-kelly-skirt-21

My ‘blinded by the sun’ look

Ok, before we get started, a disclaimer on the photos – it took me weeks (and weeks!) to get round to taking these photos – finding time when it’s not dark, or grey or miserable or raining is nigh on impossible these days. I was off work yesterday and it was a little sunny, so I grabbed my camera and ran outside. Of course, I didn’t notice until I looked at the photos afterwards that the neckline of my top was sitting properly WEIRD – it’s meant to be much more drapey at the front, and not all bunched up at the back! Also, this top is so not see through in real life! At least I don’t think it is…I think it was the weird, slightly eerie sunlight. And my top isn’t tucked in properly either and is doing a weird muffin-top thing, again didn’t notice til later, and after waiting so long, I’m not going to wait til I can re-do them! So just forgive all that please :)

megan-nielson-kelly-skirt-4

When I made the baby dungarees, I completely fell in love with the fabric I was using for them, and decided it would make a perfect Kelly skirt. I had about a metre of the corduroy left after I’d made the dungarees, and hoped that I’d be able to get the skirt out of that piece. But when I came to make it, no matter how I laid out the pattern pieces, there was just no way they were going to fit. So I took a trip to Masons to get some more of the lovely blue cord. Except they didn’t have any! Noooo! I did manage to find some purple corduroy, and some lovely flower print needle cord, both of which I purchased (enough of) to make some more Kelly skirts.

megan-nielson-kelly-skirt-24

Yes, I chopped my head off in this photo – was pulling THE most ridiculous face!

But having been visualising for weeks the blue corduroy version, I just couldn’t give up on the idea. So when I got home, I set to work figuring out how I could potentially take the pattern pieces apart so that I could eek the skirt out of my fabric. I started by turning the back of the skirt into two pieces, rather than one cut on the fold. Of course, remembering to add seam allowance onto each piece. But even that wasn’t enough. I then cut a few inches off the bottom of the back pattern piece, again, adding seam allowance onto each piece. I also cut the waistband in half, so that it would have a centre back seam. This was enough to just about get all the (important) pattern pieces out of my fabric. I also cut the waistband in the opposite direction, so the cord runs round the length of it, rather than vertically like the rest of the skirt. This was necessary to fit the pattern pieces on, but I also prefer the way it looks like this.

megan-nielson-kelly-skirt-27

The extra seams are hardly noticeable :)

The only pieces I couldn’t fit on were the pocket facings. I got out all the scraps and offcuts I had from this fabric, and laid them all out to figure out if I could piece the facings together somehow. I swear I spent longer trying to do this than on any other part of making the whole skirt! In the end, I gave up on trying to piece together the whole facing, cut the facing out of the same fabric as the pocket lining, and then attached to that just enough of the corduroy  to cover the pocket opening. Turns out I only *just* used enough corduroy – I’d forgotten that more would be showing once I’d attached the pockets, but it just about worked out ok.

megan-nielson-kelly-skirt-23

For the pocket lining, I used the same blue and white striped seersucker that I used to line the dungarees, and I got some more of the same buttons as well.

megan-nielson-kelly-skirt-35

The skirt went together really easily, despite my slight pattern alterations. There was one mistake I made though: when it said to finish off the seams at the end of each stage I thought ‘I’ll just do them all at the end’. This was mainly because I started one, using the overcasting foot on my machine, and somehow the needle hit the foot, which broke the needle, and bent the foot. So I had to give up on that idea, and I couldn’t be bothered to have to switch between my overlocker and my sewing machine constantly (mainly because they both need to use the same table space so it is a case of lifting each of them off the table each time…).

megan-nielson-kelly-skirt-38

I feel like it is shameful showing off the naked, unfinished innards of my skirt!

Of course I realised, once I’d sewn the hem and the waistband, that this meant that the ends of my finished edges weren’t neatly tucked away inside the seams. To be honest, most of the seams are still unfinished…I overlocked the edges of the pockets, but haven’t yet decided what to do with the others!

megan-nielson-kelly-skirt-39

Messy!

Helpfully, while I was planning my corduroy Kelly, Lauren published a post with a few helpful tips on making this skirt out of corduroy, such as hints on ironing and interfacing. This was a huge help, as I’d probably have ironed it normally otherwise, and then been really disappointed when I ruined my fabric!

megan-nielson-kelly-skirt-18

Broken sewing machine feet aside, the only other problem I had with skirt was with the buttonholes. Man, I am not a fan of buttonholes! My machine has an automatic buttonhole function, which is great when it works (which it always does on the test pieces), but after having ripped out 6 buttonholes from the waistband along, I was a little fed up with it! Especially when the thread is such a good colour match to the fabric, and the texture of the corduroy means that the thread kind of sinks into it, and I had to resort to a magnifying lens and a head torch to be able to see enough to rip a couple of them out!

megan-nielson-kelly-skirt-17

My attempting to kick the leaves shot!

I think the problem is that, where the buttonholes are quite close to the seams, the buttonhole foot trips up when it has to ride over the seam allowance. I have not explained that well AT ALL, but just trust me. I also have another Kelly skirt in progress, and am having exactly the same problems – haven’t managed to get one buttonhole done yet! Anyone got any tips for sewing buttonholes near seam allowances?

I might interface the button band next time – some of them have stretched a little with use.

megan-nielson-kelly-skirt-40

I also made a slight mistake with the positioning of my buttonholes and buttons – I didn’t put the top one on the main part of the skirt close enough to the waistband, and as a result, it gapes open slightly at that point. I did sew a popper in the gap to try and remedy it, but managed to sew the two halves of the popper on so that they didn’t quite line up. Boo! But at this point, it was late, and I wanted to wear the skirt the next day, so I gave up, and may not have quite remedied that yet…oops! It’s better than the gaping, but it doesn’t quite lie flat. I will fix that at some point, but I have worn it a good few times an awful lot in the meantime.

megan-nielson-kelly-skirt-25

Gaping without popper done up

megan-nielson-kelly-skirt-26

Slightly better, but still doesn’t quite lie flat

And having worn it, I love this skirt! And ohmygod, it has pockets! I mean, I have heard people raving about making skirts/dresses with pockets, but I never quite understood what all the fuss was about, until I wore this skirt for the first time. Given that none of my clothes that I regularly wear for work have pockets, it was a refreshing change to actually have some. I will definitely be making more skirts and dresses with pockets!

megan-nielson-kelly-skirt-19

Lauren’s post also made me really want a Renfrew to wear with this skirt. It’s a pattern I want but don’t have yet, but I do have a RTW top that is a very similar style. It’s a lovely drapey viscose, and it works brilliantly with this skirt. Renfrew has gone to the top of my list of patterns to purchase!

megan-nielson-kelly-skirt-7

There will definitely be more Kelly skirts in my future. Other than the one that’s already in progress, I probably will make two more out of those other cords I bought, and I’d like a cotton one as well. I think I’m going to give piping a go on the next one, after seeing Daniela’s lovely piped version. I’m also looking forward to making some more of Megan’s patterns, as this one was such a joy to sew.

megan-nielson-kelly-skirt-4

Did I mention how much I love the pockets?!

Susan Jane White

Taking the Hell out of Healthy

chinelo bally

Dressmaker| Author| Blogger| Freehand cutter

Infectious Stitches

quilting and pattern design

Red Hot Rosie

Sewing Vintage for Dummies (that'd be Me)

Laura After Midnight

Behind the seams at Midnight Costume Services!

ZegnaJewelry

ZEGNA ASTON handmade

stitchnsew

A topnotch WordPress.com site

Dresses & Me

I love to sew

Drama Queen Seams

Where handmade is back in style...

Awesome Åshild

Did You Do A "Something Every Day" Today?

Buzy Day

The adventure of NikkiM

christineshellard9

Late comer to climbing and want to share that experience with others

What Would Nancy Drew Wear?

Adventures in sewing and other crafty endeavours.

I want to be a turtle

Adventures in sewing and other crafty endeavours.

Molly's Sewing and Garage Sale Adventures

Adventures in sewing and other crafty endeavours.

Tea For Two

Adventures in sewing and other crafty endeavours.

Gertie's New Blog for Better Sewing

Adventures in sewing and other crafty endeavours.

Tilly and the Buttons

Adventures in sewing and other crafty endeavours.

'So, Zo...'

Adventures in sewing and other crafty endeavours.