Tag Archives: pattern fitting

A little late to the party – My Sew Dolly Clackett By Hand London Anna

27 Apr

I know, I know, I’m late to the Sew Dolly Clackett party. Sew Dolly Clackett is the brainchild of Sarah from Rhinestones and Telephones – getting sewists worldwide to create a dress emulating the style of Roisin as a wedding present to her and Nic. And it’s a great excuse for us all to create a dress in Roisin’s fabulous style – colourful, often novelty, prints, and well-fitting dresses!

sewdollyclackett-by-hand-london-anna-dress-25

Although I said in my post on trying to get the fit right on this dress that I was going to forget about the deadline, and just focus on getting a great fitting dress, when more and more Sew Dolly Clackett dresses started popping up in my blog reader (you can see them all in the Flickr group), the temptation to get it finished in time was too strong, and I knew I had to give it a good go.

sewdollyclackett-by-hand-london-anna-dress-27

I had a bit of time over Easter weekend (turns out, not as much as I’d planned, isn’t that always the way?!) and I managed to make some pattern adjustments, sew up a new toile, and get the dress almost completely finished, other than the zip and the hem. I didn’t think I’d have any problem getting those done before the deadline on Wednesday. Famous last words.

sewdollyclackett-by-hand-london-anna-dress-28

Anyway, I’ll get to that, let’s go back to where we left off in the my last post. I’d sewn up a toile in a UK size 10, but had a lot of excess fabric across the chest and the back. Thank you all for your helpful comments on that post, I did a lot of research, reading about other people’s fitting issues, and how they’d fixed them (Neeno’s and Sonja’s were especially helpful).

I tried going down a size and doing a full bust adjustment, using Alison’s tutorial. This is what my pattern piece looked like when I was done with it:

By Hand London Anna Dress FBA

It did not work. It ended up too big across the bust, and I decided that this definitely wasn’t the way to go. I went back to my original toile. The main ares of excess fabric were across the top of the chest and back, and the point at which the sleeves joined the body (or where the would, if they weren’t cut on). This photo shows where I’d pinned out all the excess:

Anna-dress-fitting

Taking the wedges out the top of the neckline would have been straightforward enough, but I just couldn’t work out a way to take out the excess by the sleeves – all the excess was in the middle of the fabric, not at the edges, so taking out a wedge wasn’t going to work. I spent quite a while trying to get this to work, but it just wasn’t happening – I couldn’t find a way of doing it where I was happy with the result.

Due to the fact that the toile fitted well across and under the bust, and all the excess seemed to be in the upper chest, I wondered whether it would work if I tried grading out the sizes. I retraced my pattern (for about the 4th time, ughh!), tracing off the 8 for the top half, grading out to the 10 just under the bottom of the sleeves. I fudged it a little bit – on the pattern piece, the shoulder line of the 8 sits above that of the 10. I stuck with the line for the 10 here, but then only extended it out as far as the 8.

sewdollyclackett-by-hand-london-anna-dress-40

I also did a narrow back adjustment on the back bodice piece, taking out half an inch on each side of the bodice – this was something that was picked up when I did my fitting course, and as there seemed to be excess fabric all the way down the back, I thought this would help.

sewdollyclackett-by-hand-london-anna-dress-39


I didn’t do any other adjustments at this stage – I thought that I might need to, but decided to work those out once I had sewed up the toile. As it turns out , I didn’t need to :) The fit of the toile was pretty good, a definite improvement on the last one.

sewdollyclackett-by-hand-london-anna-dress-5

sewdollyclackett-by-hand-london-anna-dress-8

It was actually a little tight now, so I let out the side seams a bit, sewing them up with 3/8 inch seam allowance instead of the usual 5/8, and that was enough to fix the issue. I also put the zip in by lining up the edge of the fabric with the zipper tape, rather than using a larger seam allowance here.

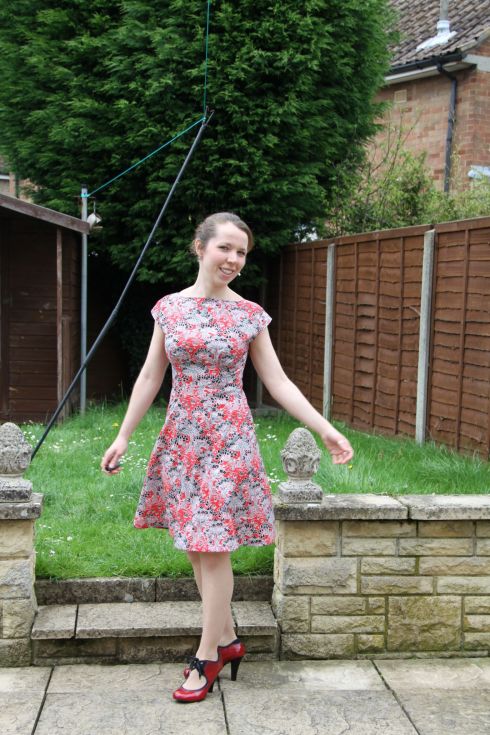
I was happy enough with this fit to get straight onto making the actual dress – yay! I bought this fabric when I went to Goldhawk Road in March. The colour of the fabric I chose was entirely determined by the only pair of Roisin-worthy shoes I own! I chose to make another By Hand London Anna, which is one of many patterns that Roisin has made multiple times. Her swimmers Anna was one of the first ones I saw that made me decide I needed to make this pattern!

sewdollyclackett-by-hand-london-anna-dress-37

The pattern specifies that for a size 10, midi length Anna, you need 2.6m of fabric. I knew, based on my last Anna, and other people’s comments, that this was an over-estimation, so I bought 2 metres of this cotton lawn from Classic Textiles, for £7/m. It wasn’t until I got home that I realised that this fabric was a directional print and so, according to the pattern, I’d need significantly more. This threw me into a bit of a panic, I had a vision in my head of Anna made up in this fabric, and wasn’t going to be going anywhere near Goldhawk Road again to get any more :( But I decided to lay out the pattern pieces and double check that I didn’t have enough. Turns out I did! 2m of (50″ wide, so not sure if this would work with 45″) directional print fabric is enough to make a By Hand London Anna :) That made me very happy! I’ve even got some pretty decent sized scraps left over.

sewdollyclackett-by-hand-london-anna-dress-9

Most of the rest of sewing up the dress went without a hitch – I said it last time I made this dress – this is a lovely pattern to sew up – it’s one of the quickest sews I’ve had. I used French seams throughout. I didn’t think I’d be able to on the reduced bodice side seams, but just about managed. I then overlocked the edge of the facing, and the waist seam.

sewdollyclackett-by-hand-london-anna-dress-44

All was going well until I tried to insert the zip on Wednesday evening. I know invisible zips get a lot of bad press, but I have to say, I have never had a problem with them. I use an invisible zip foot, and they have always gone in beautifully – no zipper tape showing at all – truly invisible. But of course, the one time I needed to get a dress finished for a deadline…I don’t know why it wasn’t work – every time I put it in, the stitching was either way too far out from the teeth, so that a few mm of zip tape was visible on either side of the zip when done up, or, when I tried to get the stitching closer, I ended up sewing through some of the teeth, so it wouldn’t do up. After 4 unsuccessful attempts, I took Claire’s advice and took a break from it. But after cooking dinner, I just didn’t have the energy go back to it. So I had to admit defeat at getting it into the sewalong on time, but I knew that I wasn’t going to get a good result by rushing it.

sewdollyclackett-by-hand-london-anna-dress-23

Slight wrinkly back, but I’m not going to let that bother me!

I had some time to go back to it on Saturday, and FINALLY managed to get the zip in in a vaguely acceptable fashion. Still not perfect, there’s still a bit of zipper tape visible around the waistline, but it was good enough.

sewdollyclackett-by-hand-london-anna-dress-42

There was only one problem with the zip insertion – the top of the dress didn’t quite line up (neither did the waistline or the hem, by even more). It was only about 4mm out, and I was going to leave it as it was (I had finally got the zip in, I felt I ought to take that and run!), butttttt…I decided to re-do one side of it to get it to line up better.

sewdollyclackett-by-hand-london-anna-dress-11

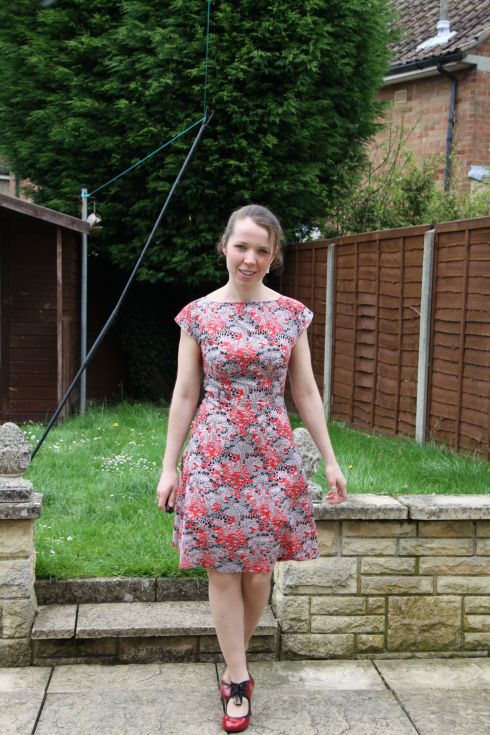
Luckily the zip went in ok again this time, and the top of the dress is now lined up, although the waistband and hem were still a little off. I had already taken 1 3/4 inches of the bottom of the hem, so I just trimmed off the excess from one side to make it even, and then turned it up by the specified amount. My previous Anna dress was a bit long for my liking, but this one is just right, hitting at my knees.

sewdollyclackett-by-hand-london-anna-dress-21

As you can see from the photos, the fit on this dress is pretty spot on – I’m absolutely delighted with it. I think it’s safe to say that this is the best fitting garment I’ve made – it was definitely worth the time it took to get the fit right.

sewdollyclackett-by-hand-london-anna-dress-36

sewdollyclackett-by-hand-london-anna-dress-15

sewdollyclackett-by-hand-london-anna-dress-32

Stupid smile, because the fit of this dress makes me deliriously happy :)

sewdollyclackett-by-hand-london-anna-dress-31

And because a dress wouldn’t be a Dolly Clackett dress without a name, I’m calling this one the ‘Get me to the church on time’ dress. Maybe next time I will make it!

sewdollyclackett-by-hand-london-anna-dress-19

I am, and I’m sure many other sewists are too, really grateful to the competition for encouraging us to sew up a dress in a print that we might normally not have chosen. I love my dress, and I do have the fabric for another Sew Dolly Clackett dress lined up as well. My dress may not have made it to the wedding, but it’s in it for the marriage. I wish Roisin and Nic all the best for theirs.


Pattern fitting course with Fit2Sew

6 Nov

There’s been a bit of radio silence around here recently, what with all the house buying and suchlike. I haven’t even been managing to keep up with my blog reading. But a couple of days ill laid up in bed (seriously, I feel like someone has filled my sinuses with lead) has given me a bit of time in between steam inhalations to catch up, once I cleared the 700 unread blog posts from my reader so I could start clean! It’s also reignited my desire to sew, and while that is a little tricky from bed, I can at least catch up with writing a few blog posts, so you should be hearing a bit more from me now! Although I do apologise in advance that this one is a bit text heavy and lacking pretty pictures! Some of those coming in posts soon I promise!

One Sunday about a month ago, myself and two sewing friends went on a pattern fitting course, and boy was it useful! The course was with Mandy at Fit2Sew in Croydon, and I first came across mention of her course on Daniela’s blog. I’ve had a few fitting issues with things I’ve made, namely that they inevitably end up too big on the top half, and I end up taking a couple of inches in at the back when I put the zip in. Even then, they can still be too big at my waist and shoulders.

fit2sew

I love the first dress I made, but I have to admit that I have hardly worn it because, despite my taking in at the back, it’s still too big round the waist and I really don’t like that. The yoke is also a bit wide.  I had come to the realisation that I probably ought to be making a smaller size and doing a full bust adjustment, and I probably could have worked out how to do that myself. But I wanted to know if there were any other adjustments I should be making, and also know that I was measuring and doing the FBA correctly – I didn’t want to get to the stage where all the clothes I made were badly fitting and in the end I just got fed up and gave up on sewing. This course seemed like just the thing to get me making clothes that fitted, and that I really loved. I also thought that it would be really helpful to have someone who know what they’re doing identify what issues I need to address when fitting, rather than trying to work them all out myself!

The technique that Mandy teaches is the Palmer/Pletsch method of tissue fitting. The technique works by making all of the necessary adjustments to the pattern tissue, before you even think about cutting into the fabric. This should, in theory, cut out the needs to make multiple muslins of a pattern, as you can keep making each adjustment to the same piece of tissue, until your happy with the fit, and then either just making one muslin to check the fit, or go straight to cutting out your fabric. Mandy has very small class sizes (max 3 I believe) which is great, and means she has lots of time to go through everything with each of you. She is one of only two people in the UK who is a Palmer/Pletsch certified instructor. The introduction to pattern fitting course that we did costs £45 for the day, which is great value for what you get.

We started the class by taking our high bust measurement. That’s it. Just the one measurement. We then used our high bust measurement to choose what pattern size we needed to use. the pattern used is McCalls Palmer/Pletsch fitting shell 2718. My came out at a 12. We then prepared the tissue pattern pieces for that size – taping around and clipping the curves, and pinning in darts and the side seams.

mccalls 2718

Once our pattern pieces were taped, and pinned together, we tried them on to check the fit. Once we were happy we had the correct size, we started working on any adjustments we needed to make, starting with the back. I needed a slight (half inch) narrow back adjustment. It was also evident that I would need a full bust adjustment, but we needed to make the adjustment to the back first, so we took them off, took in a tuck on the back, which we taped down, then pressed the tissue, pinned it back together, and tried it on again.

IMG_2774

My finished bodice front, with all adjustments made. Unfortunately I didn’t get any pics as we were going along, so here’s a few from when I used my pattern pieces to make my toile.

Now that we were happy with the fit on the back, we moved onto the front. The tissue fitted well across the top of my chest, with the centre seamline on the tissue meeting the centre of my chest. However, further down it did not meet. By measuring the distance between the seamline (NOT cutting line) on the tissue, and the centre of my chest, we established that I need 3/4 inch FBA. In fact all 3 of us needed an FBA of a similar amount, so we took our tissue off again to make this adjustment. Mandy explained the adjustment brilliantly, and pretty soon we were all done with that. Trying it on again, the tissue bodice now met across my chest nicely :)

After that, I just needed one more small adjustment – a slight forward shoulder adjustment. The two Clares (I now have three sewing friends called Cla(i)re, Marcus insists on giving them numbers so he knows which one I’m talking about!) both needed a horizontal tuck across their upper chest to reduce some baggy tissue, as well as a sleeve adjustment, and one of them also needed a slight sway back adjustment.

IMG_2773

Finished bodice back pattern piece with narrow back tuck, and forward shoulder adjustment.

After we’d finished making all the adjustments to our tissue, we made a note of all the adjustments we’d made, and Mandy then talked us through some dart manipulation techniques, so that we could apply the same FBA to different styles. I have to say that, despite Mandy explaining it well I didn’t *quite* get exactly how you’d do the adjustment on different styles, but I think I just need to give it a go and it will become clear.

fit-for-real-people

All the adjustments are also explained really clearly in the Palmer/Pletsch book Fit for Real People. I bought this book before the course, so that I could read about the technique beforehand, and hopefully have a better grasp on the course. I have to admit, I am one of those people who buy a book (particularly reference books) and then hopes that, by owning it, I can absorb the information by osmosis. Oh how I wish that worked. I buy books with good intentions of learning about whatever they’re about, and then never actually sitting down and reading them. Not so with this book. Although the cover (and many of the images) make it look like it is straight out of the 80s, it is one of the most readable reference books I have come across. In two sessions, I’d read through the first 60 pages. Everything is explained so clearly, and it’s well organised so that you can easily find the information about the adjustment you want.

Just an FYI, because I know a lot of people go straight to Amazon for books – I got it from the The Book Depository where it was much cheaper (£12 as opposed to about £21, they do free worldwide delivery too, and I’ve just discovered that you can get 5% cashback through Quidco too). The course was based largely on the information in the book, so it’s a great tool to refer back to now that I’ve done the course. Palmer/Pletsch also do a DVD called ‘Full Busted’ (ah I can just see the search terms which are going to lead people to my blog now!), which apparently shows you how to do an FBA with various different styles of pattern, which I have heard good things about. I don’t have the DVD, the cheapest place I can find it is on Amazon for £20 (annoying when the US RRP is $20)(scratch that, just found it on The Book Depository for £10!) but based on how good the book is, if I needed a bit more guidance with doing the adjustments with different styles, I think it would be worth it.

Having spent a while looking for the perfect pattern weights, I finally stumbled on the idea of using the weights from my parents' old set of imperial scales.

Having spent a while looking for the perfect pattern weights, I finally stumbled on the idea of using the weights from my parents’ old set of imperial scales.

I came home from the course, and immediately cut out a toile, based on my paper pattern. Because you only fit the paper pattern on one half of you, its worth doing at least on your first garment, so you can check and see if you need to make any changes to the adjustments for your other side – e.g. if you have uneven shoulders. The toile seems to fit me really well, so I’m happy with that.

IMG_2777

I was dying to put what I had learned into practice and actually make something, but unfortunately I haven’t had a chance yet, what with my change in plans for my week of sewing! I also want to try the first attempt out on a bodice that has darts, rather than another style, so that I can just directly apply what I’ve learned. Most of the patterns I have lined up to make have princess seams, or under bust pleats, or some other design. I’ve been wanting to make Simplicity 2444, which does have darts, but I only have the larger of the two pattern sizes, and based on my high bust measurement and the finished garment measurements, I ought to be making it up in a size 8, so I’ll have to procure the smaller pattern size before I can have a go at that.

Having looked at the measurements for Simplicity 1803, which was the first dress I made, based on my high bust and finished garment measurements, I should have made a size 6 (34 inch high bust), and then done an FBA. Given that, according to the pattern, I measured up as a size 16 (37 inch full bust), and actually made a size 12 (once I’d taken account for their ridiculous 4 inches of ease), it’s no wonder that I still find it too big. I’m going to try tissue fitting this pattern in a smaller size, and see what difference that makes. Although the waist and hip sizes for the smaller pattern sizes would in theory be a bit small for me, the FBA also adds some width to those parts as well, so that should be addressed. And, as Mandy pointed out, it is easy to add some width to the side seams at the waist and hips, it’s much more important to get the shoulders fitting properly.

1803_env_back_11

If you are thinking about doing a course on fitting, or struggling with fit at all I’d highly recommend Mandy’s course. She also does specific courses on fitting a shift dress or a pair of trousers. Depending on funds, and how I get on with putting the fitting into practice, I’m seriously considering doing her shift dress course at some point in the future.

I’ll let you know how I get on with my fitting, and hopefully you’ll see lots of beautifully fitting clothes on here in the future!

Susan Jane White

Taking the Hell out of Healthy

chinelo bally

Dressmaker| Author| Blogger| Freehand cutter

Infectious Stitches

quilting and pattern design

Red Hot Rosie

Sewing Vintage for Dummies (that'd be Me)

Laura After Midnight

Behind the seams at Midnight Costume Services!

ZegnaJewelry

ZEGNA ASTON handmade

stitchnsew

A topnotch WordPress.com site

Dresses & Me

I love to sew

Drama Queen Seams

Where handmade is back in style...

Awesome Åshild

Did You Do A "Something Every Day" Today?

Buzy Day

The adventure of NikkiM

christineshellard9

Late comer to climbing and want to share that experience with others

What Would Nancy Drew Wear?

Adventures in sewing and other crafty endeavours.

I want to be a turtle

Adventures in sewing and other crafty endeavours.

Molly's Sewing and Garage Sale Adventures

Adventures in sewing and other crafty endeavours.

Tea For Two

Adventures in sewing and other crafty endeavours.

Gertie's New Blog for Better Sewing

Adventures in sewing and other crafty endeavours.

Tilly and the Buttons

Adventures in sewing and other crafty endeavours.

'So, Zo...'

Adventures in sewing and other crafty endeavours.